Exchange comes out of the box with features that
allow you to connect mobile devices to compose and read messages and
other items. The technology that Exchange uses for mobile device access
is called ActiveSync. ActiveSync is based on HTTP and is designed for
Internet-based connections. The following types of items can be accessed
with mobile devices using ActiveSync:
Email messages
Calendar
Contacts
Tasks
When managing mobile
device access for Exchange, it's important that you know how to
configure access for the devices, how to manage the features and
settings that are imposed on the devices, and—since these devices are
accessing email primarily over their public cellular-based Internet
connection—how to secure and protect the devices and the data that is
stored on them.
1. Configure Mobile Device Connectivity
Configuring mobile
device connectivity is a straightforward task. Most of the settings are
preconfigured out of the box, and will only require a little tweaking if
you want to enable or disable certain aspects.
1.1. Enable or Disable Exchange ActiveSync
ActiveSync is enabled by
default when the Client Access role is installed. Since it uses HTTP as
its protocol, the only firewall ports that need to be opened are port 80
for HTTP or port 443 for HTTPS.
NOTE
As with most HTTP-based
communications, HTTPS provides an extra layer of protection by
encapsulating the connection in a Secure Sockets Layer (SSL). Since
credentials are exchanged over this protocol, it is highly recommended
that you require the use of HTTPS for ActiveSync and disable HTTP
without SSL. This is the default configuration on the CAS.
To enable or disable
ActiveSync on a CAS, you will need to stop the application pool for the
IIS virtual directory that ActiveSync uses. You can use the following
steps to enable or disable ActiveSync on an Exchange server:
Open the IIS Manager tool.
In the Console tree, select the Application Pools node.
The list of available application pools for this server appears in the Results pane in the middle.
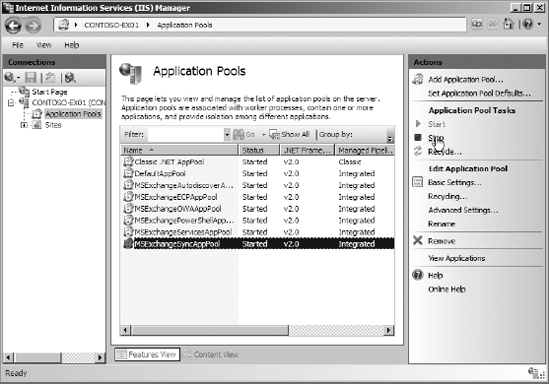
Find the application pool called MSExchangeSyncAppPool. This is the application pool for ActiveSync.
Click
the MSExchangeSyncAppPool application pool and choose the Stop command
from the Application Pool Tasks menu in the Actions pane on the right,
as shown in Figure 1. Choosing Stop will disable ActiveSync. Conversely, choosing Start will enable ActiveSync access.
1.2. Enable Mobile Device Access for Users
Mobile device access can also
be enabled and disabled on a per-user basis. If you have multiple users
and you want only a select few to be able to access email with their
mobile devices, you can use the following steps.
NOTE
ActiveSync is turned on by
default for all users. You will need to explicitly turn it off if you
don't want to allow mobile device access for a user.
1.2.1. Use the Exchange Management Console to Enable or Disable Mobile Device Access
To enable or disable mobile device access through the EMC:
In the Console tree, browse to the Recipient Configuration => Mailbox node.
The list of mailboxes is displayed in the Results pane.
Click
on the mailbox that you want to enable or disable mobile device access
for and choose Properties from the Actions pane on the right.
This will launch the properties dialog box for the recipient that you selected.
Select the Mailbox Features tab.
The Exchange ActiveSync feature controls mobile device access to the mailbox.
Select
the Exchange ActiveSync feature in the list and select either Enable or
Disable to allow or disallow mobile device access for this mailbox.
1.2.2. Use the Exchange Management Shell to Enable or Disable Mobile Device Access
To enable or disable mobile device access using the EMS, you will use the Set-CASMailbox command. For example, to enable mobile device access for John Smith, you would use the following EMS command:
Set-CASMailbox "John Smith" -ActiveSyncEnabled $true
Similarly, to disable mobile device access for John Smith, you would use
Set-CASMailbox "John Smith" -ActiveSyncEnabled $false
1.3. Restrict Devices
By default users can
synchronize any ActiveSync-capable device with Exchange. However, mobile
device settings in Exchange can get very granular. One option that you
have is preventing users from connecting with specific devices. You can
disable mobile device connectivity for a device by obtaining the device
ID.
To obtain the device ID for a user's mobile device, use the Get-ActiveSyncDeviceStatistics
command in the Exchange Management Shell. The following command can be
used to display the devices used by a user along with the device IDs,
model names, and the phone numbers of the devices:
Get-ActiveSyncDeviceStatistics -Mailbox:[alias] |
ft DeviceModel, DeviceID, DevicePhoneNumber
NOTE
The device ID for a mobile device can be obtained only after the user has synchronized the device at least once.
After you obtain the device ID, you can add the device to the block list. To do this, you use the Set-CASMailbox command with the ActiveSyncBlockedDeviceIDs parameter. The following command adds John Smith's device ID to the block list:
Set-CASMailbox "John Smith" -ActiveSyncBlockedDeviceIDs
32194329043269432874
In a similar manner, you can also block every device except for the device IDs that you deem acceptable. To do this, you would use the Set-CASMailbox command again, but use the ActiveSyncAllowedDeviceIDs parameter instead. If this parameter is not specified as a null value, then every device is blocked expect those listed in this parameter.
Set-CASMailbox "John Smith" -ActiveSyncAllowedDeviceIDs
32194329043269432874
If you want to clear the
device IDs that are currently in the allowed and blocked lists, run the
previous commands, except pass the parameter the $null value instead of the device ID:
Set-CASMailbox "John Smith" -ActiveSyncBlockedDeviceIDs $null